Hacking is a mysterious and common word today with increased number of websites and people having become the victim of hackers. So when I was assigned the task of hacking a VoIP phone as a part of the interview process for a security company, I was at the end of my wits. So let me explain how I approached and solved the task.
The task started off with a phone being mailed to me as well as a sheet of paper with clues. The first clue was
- ssh/admin/admin h1m0mz
So using this clue, I was able to ssh into the phone with user: admin and password: admin. But the shell that I entered had limited access. So I used nmap to search for all the open ports on the device.
$ nmap -sV ip_address

Host is up (0.0086s latency).
Not shown: 998 closed ports
PORT   STATE SERVICE VERSION
22/tcp open  ssh     Dropbear sshd 2013.58 (protocol 2.0)
80/tcp open  http    mini_httpd 1.19 19dec2003
Service Info: OS: Linux; CPE: cpe:/o:linux:linux_kernel
The above information helped me know which services are running and their version information. I used this information to check the Internet and see if there were any remote execution bugs but was unable to find any.
I still had not found any use for the second part of the first clue h1m0mz. I accidentally entered this in the terminal, and this showed up in the terminal.
$ h1m0mz

Challenge: 6f4a767546f02d16
Response:
This is a challenge-response authentication system, and I had no idea about the secret key that I needed.
So I looked at the second clue.
- You might want to do some soldering.
I started examining the PCB of the phone, after close inspection I came to the conclusion that the only part that could exploit was the SPI serial flash. I also found it hard to locate the datasheet for the chip as the markings were not very clear. But based on experience working with these chips, I knew that the manufacturers try to keep the pinouts similar so that they are pin to pin compatible with other devices. The flash had eight pins and by looking for common flash chips, I was able to find the appropriate pinouts.

I started by looking at the spi signals, and the clock speed was very high at around 50 MHz. I used a Buspirate to try to read the flash chip. Flashrom is an excellent piece of software that can be used to read and write flash chips and it also supports Buspirate. I tried to read the flash, and I did not get any valid response, but during the process, I was able to find that the name of the flash chip was GD25Q128C by [GigaDevice][http://www.gigadevice.com]. I desoldered the flash and tried to read it again, and I was successfully able to read the contents of the flash to PC.
The first thing I did after I read the flash was to run strings. But looking at the first few lines like the one below, I came to the conclusion that I had endianness problem.
tooBfvd v 99.2.1-1.6 2cr2102.40.( 10 nuJ2 22 51061 -:72: )139bve-819ipsq
I wrote a small program in C to fix the problem.
in_fp = fopen(input_filename, "r");
out_fp = fopen(output_filename, "w+");

while(fread(&buffer, 4, 1, in_fp) == 1) {
    swapped = ((buffer >> 24) & 0xff) | // move byte 3 to byte 0
                ((buffer << 8) & 0xff0000) | // move byte 1 to byte 2
                ((buffer >> 8) & 0xff00) | // move byte 2 to byte 1
                ((buffer << 24) & 0xff000000);
    fwrite(&swapped, 4, 1, out_fp);
}
The above string after fixing the endianness got converted to an valid readable string as below.
Boot dvf99 v1.2.6.1-rc2 2012.04.01 (Jun 22 2015 - 16:27:31) evb9918-qspi
Binwalk is an awesome firmware analysis tool. Binwalk reads the flash file and does a search for different file type signatures and in the end gives you information about the location of various file partitions like uboot, filesystem, etc. It can also extract them for you too. Binwalk gave the following info for my file.
> binwalk image_file

DECIMAL       HEXADECIMAL     DESCRIPTION
------------------------------------------
120702        0x1D77E         device tree image (dtb)
128427        0x1F5AB         Certificate in DER format
128539        0x1F61B         Certificate in DER format
182890        0x2CA6A         CRC32 polynomial table
262544        0x40190         PEM certificate
263960        0x40718         PEM RSA private key
278528        0x44000         device tree image (dtb)
311324        0x4C01C         Zlib compressed data
319516        0x4E01C         Zlib compressed data
327708        0x5001C         Zlib compressed data
335900        0x5201C         Zlib compressed data
352768        0x56200         uImage header
352832        0x56240         Linux kernel ARM boot executable zImage
2195968       0x218200        Squashfs filesystem
7963136       0x798200        Squashfs filesystem
    ........
I was able to extract the contents using the following command.
binwalk -e image_file
Binwalk extracted the system directories, and I was now able to see all the files in the root directory. Now, I had to find the executable responsible for the limited shell. I searched for the string h1m0mz in the entire file system and was able to find the right executable.
$ grep -rns "h1m0mz" *
Binary file sbin/config matches
After disassembling the file and inspecting the flow of the code, I came across the section below where three strings were being concatenated using sprintf.
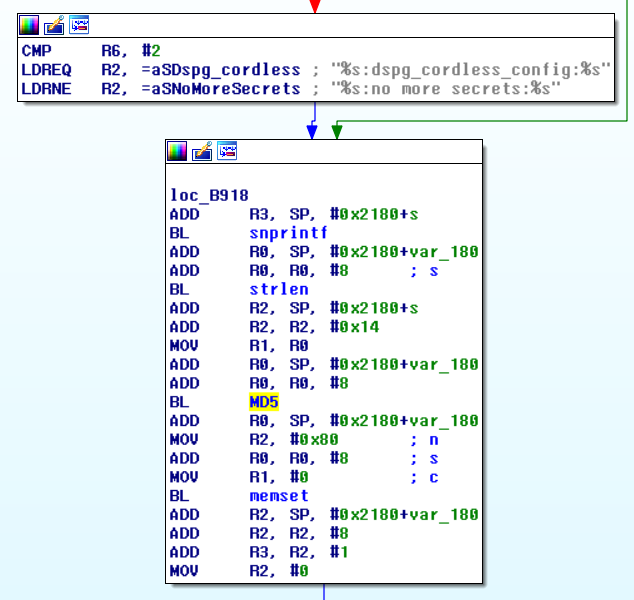
The first part of the string was the challenge value printed onto the console and second part of the string was being read from non-volatile ram using nvram_get_safe(2) which had its value set to admin. You can also see from the above figure that the concatenated strings are passed on to MD5 function. By now I had all the necessary components to generate the response string.
I was very excited about my progress, and I directly jumped to my jupyter notebook and used the following to get the md5sum.
def generate_response(challenge):
    secret = ':no more secrets:'
    pwd = "admin"
    c_str = challenge + secret + pwd
    md5 = hashlib.md5(c_str.encode()).hexdigest()
    result = md5[:16]
    print(result)

$ generate_reponse('6f4a767546f02d16')
6949c6c6eda6c92c
I entered the above string in the ssh terminal, and I got no response. I was very disappointed and had to find a different way to solve the problem.
Qemu is a generic and open source machine emulator and virtualizer that can be used to emulate arm architecture. I tried to run the executable using Qemu and to my surprise, I was successfully able to execute the program without any problems after I had fixed the paths for the library files.
$ qemu-arm sbin/config
 /lib/ld-uClibc.so.0: No such file or directory
 # Set path for the library files
$ qemu-arm -L ./ sbin/config
****************** Command Shell Copyright 2014
(null)> h1m0mz
Challenge: 29cde8e90d35839d
Response:
I wanted to use gdb to debug the code and stop at the point where the string entered in the terminal was being compared to the one generated internally. So I started the gdb server on Qemu and stepped through the code.
T1> qemu-arm -g 23946 -L ./ sbin/config
T2>gdb-multiarch
(gdb) file sbin/config
(gdb) layout asm
(gdb) layout regs
(gdb) break *0x0000B91C
(gdb) break *0x0000B9AC
(gdb) target remote localhost:23946
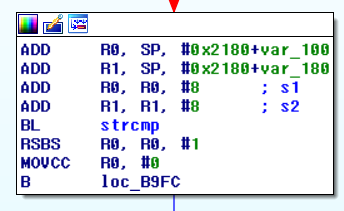
The first breakpoint coincides with sprintf function call and second with strcmp. Arm architecture uses registers R0 to R4 to pass the arguments to the functions.
# First  breakpoint at sprintf
(gdb) x/s $r2
0xcced: "%s:no more secrets:%s"
# Challenge hash printed to the console
(gdb) x/s $r3
0xf6ff5ef8:     "29cde8e90d35839d"

# Second breakpoint at strcmp
(gdb) x/s $r0
 0xf6ff5e40:     "entered-response-hash"
# Valid hash
(gdb) x/s $r1
 0xf6ff5dc0:     "a8c90449c65cb8a4"
I entered the string obtained from the gdb and entered into the console of the phone, and I got the following response.
$ h1m0mz
Challenge: 29cde8e90d35839d
Response:
[l33t! enjoy the candy, come in for an interview. look in oem for directions. use this for the passphrase.]
I used find to locate the oem file, and one more trick I learned was to use nc to transfer files over the network.
find . -iname oem

# File transfer over network
$ nc -l -p 1234 > filename
$ nc -w 3 reciever-ip-address 1234 < filename
After finding the oem file and executing it, I was able to locate the bitcoin key. And now I could finally call myself a Hacker.